Apple Laptop Recovery: How to Remove the Hard Drive
Some of the Apple laptops (especially older models) require a bit of technical skills and patience to remove the data drive from the computer's guts. Plus, you may need a set of special screwdrivers and other tools. Apple support recommends using a qualified service person to do it, especially, if your computer is under the manufacturer warranty - as the removing the hard drive from Apple notebook may void the warranty, and there's always some risk of accidental damage to the computer.
Bear in mind one more option. Our data recovery lab does not charge for the drive extraction, therefore that's fine if you send the whole computer in one piece.
If you are still serious about your own drive removing, here are few hints beside many of the online manuals from MAC enthusiasts and professionals, with detailed instructions how to take apart the whole computer to reach the hard drive.

Simple drive removal directions for MacBook Pro
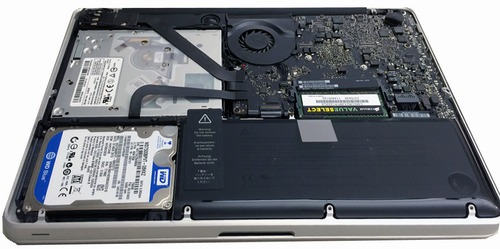
- Turn the MacBook Pro upside down and place laptop on a soft surface.
![MacPro HDD removing: Step 1]()
- Remove the bottom plate, put it to the side and disconnect the battery before you continue your further manipulations.
![Step 2]()
- The hard drive is held in place by a little piece of plastic or bracket. Remove the two Phillips screws holding down the hard drive bracket, carefully lift the hard drive out of the MacBook Pro case, disconnect the hard drive cable and use your Torx-6 driver to remove the screws from the sides of the hard drive.
![Step 3]()
Note: To release the drive from some of MacBook models it may also require disconnecting the optical drive cable, camera cable and the cables hooked into the AirPort/Bluetooth bracket (around the top left), and the AirPort/Bluetooth bracket itself. Plus, you may need to disconnect the right speaker/subwoofer cable from the logic board before disconnecting the hard drive and optical drive cables from the logic board.


Tools you may need to work with Mac Laptops
There are many computer repair tools available on the market today. Make sure your tool kit includes these instruments required to remove a hard drive or to repair any Mac computer.
- Pentalobe screwdrivers to remove the pentalobe (five-pointed) security screws
- P5 (1.2mm) for MacBook Air and MacBook Pro with Retina Display
- P6 (1.5mm) for MacBook Pro (2009) Battery - 15” only
- Tri-wing Y0 Screwdrivers for Macbook 13" Macbook Air 11" 13" and Macbook Pro 13" 15" 17" Early Models
- Torx T5/ T6 Screwdrivers
- Phillips #0 and #00 Screwdrivers
- Spudger
After you are done with the hard drive removal you may proceed to placing the data recovery ticket for drive recovery service on Data Lab 247, starting with instant quotation for a valid and successful result.
Some of the hard drives recovered in Data Lab 24/7
After reboot the hard drive lost files, Seagate Momentus 5400.6
To rule out a hardware issue when troubleshooting the company's computer with MAC OS X, the IT specialist ran Apple Hardware Test and performed diagnostics with extended testing option.
He found the problem with internal hard drive. The defective drive is heading to Data lab for thorough expert data extraction.
The critical movie files in restored project folders for Apple Final Cut Pro X and iMovie are all good. No flows were detected with videos. Movie maker from Toronto
Tech support advised me to order recovery service for shocked Z5K500-500 drive
The hard drive is not accessible and can't be found. It's in the same condition as when it was removed from the machine because of the failure. We attempted to connect the drive using an external enclosure which was unsuccessful. The drive has never been opened and it has all original parts. We need you to recover contents from the DMS folder located in the root of the C: drive. The .mdb files are the most important, but the entire folder would be ideal.
We are very satisfied with the results of the provided services by your recovery team. In all our future needs in like services, you definitely will be the first choice to seek the help from. We are the budget institution and your prices can fit into it. Thank you very much for all your efforts. Meriden Public Schools, Meriden, Connecticut, United States